
A Quick Demo Tutorial
What's in the box
Let's get your Horizon S3 body camera up and running! Start by getting familiar with your camera
Your Horizon S3 Body Camera

Your multi-dock station, ethernet cable + power plug (if you ordered one)

Your single-dock station + power plug + cable

Step 1: Prepare for Set-Up
To make your setup as smooth as possible, have the following ready:
- A reliable internet connection
- Your device is pre-configured to connect to the Wi-Fi network you provided during the order process.
- If you purchased a SIM card, your camera will automatically connect to the cellular network once powered-on.
- Alternatively, you can also connect your camera to the access point using WPS (if enabled).
- To configure your camera to connect to a Wi-Fi network via Vault, please follow the instructions at the following link
- Your Vault account and password
Sign in using the email address submitted during the order process. If this is your first time accessing Vault, click "Forget Password" to create your login credentials.
Step 2: Turn on your body camera
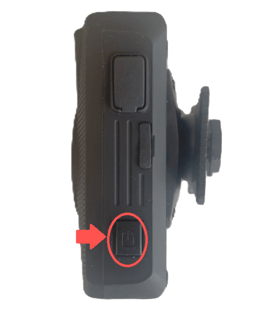
Press and hold the power button (located on the right side of the device at the bottom) and hold for 3 seconds. The camera will vibrate and the screen will change to the default display (this may take a few seconds)
Note: If your camera does not turn on, it may need to be charged (see Step 4). Plug it in using the provided charging cable and try again after a few minutes.
Step 3: Upload your first video
👤 Make sure your camera is assigned to a user
Your camera must be assigned to a user to upload footage. Based on the information you submitted during the order process, this should already be set up - but it's easy to check:
-
- Log in to Vault and navigate to the Cameras section from the sidebar
-
 Find your camera in the list by matching the serial number (located on the top back of the device). In the Checked Out By column, you'll see the assigned user
- If not assigned, click on the camera. On the right, under Currently Assigned To, select the appropriate user from the drop down and click Assign
-
- Please refer to the following help article if you are unsure how to assign your camera: How to assign your camera in Vault
- Please refer to the following help article if you are unsure how to assign your camera: How to assign your camera in Vault
🔴 Start recording
-
- Single press the Record button on your camera (located on the front of the device)
- Single press the Record button on your camera (located on the front of the device)
-
- The camera will vibrate and a recording timer will appear on the screen
- The camera will vibrate and a recording timer will appear on the screen
-
- Single press the Record button again
- The timer will be dismissed from the screen
⬆️ Upload your recording to Vault
-
- Your camera checks for new recordings every minute and will begin uploading automatically if it has an internet connection (via Wi-Fi or 4G if a SIM is installed). Your device will show the following symbols to indicate its connection status
| Wi-Fi connected |  |
| Wi-fi disconnected | |
| 4G connected |
-
- The screen will update to indicate if an upload is in progress (this may take a few seconds depending on the size of the recording)
| Files uploading (e.g. file 6 of 10 is uploading) |
|
| File upload progress |
-
- Once your recording has finished uploading, the file will be deleted from the camera and available for review in Vault
- If your recording is not uploading, please check your camera's connectivity and signal strength
Note: Uploads will not work without an internet connection
💻 View your recording in Vault
-
- Log in to Vault and navigate to the Videos tab
-
- Your recording should be visible in this list


Step 4: Charging your device
To charge your camera, plug in the docking station using the provided USB-C cable and power plug. Place your body camera on the dock (the built-in magnets will hold this securely in place).
If the device is charging successfully, it will power on and the front LED light ring will pulse white. The light ring will change to solid white once fully charged
Step 5 (optional): Connecting your multi-dock
If you purchased a multi-dock station, you can set it up by connecting the power cable and inserting the RJ45 cable to one of the ports of your multi-dock. Ensure your network dock is plugged into a router or wall socket that provides internet connectivity. Flip the red switch to power it on.
- You should notice orange and green LEDs flashing below where you inserted the cable
-
This will allow you to charge and enable internet connectivity for your camera when docked or allow you to daisy-chain another multi-dock to provide an internet connection to another 10 cameras
- If you place your camera in one of the slots of the multi-dock station to upload your recording via the RJ45 internet connection:
- It will disconnect from any 4G connection it's using and the camera LED ring will start flashing to indicate that it is charging. Fully charged cameras will change to a solid white
- The top left of the LCD screen will display
 to indicate the camera is in the dock but it has not yet obtained an IP address
 - This symbol should change to green after a few seconds to indicate that the camera has obtained an IP address on the network
Offline ethernet connection 
Online ethernet connection 
Step 6: Looking to do more?
This onboarding guide covers the essentials to get you up and running. For everything else, check out our Vault Help Center for step-by-step articles and tips.
Step 7: Need some help?
Our experts are here to provide you with the assistance you need. Get in touch with us today!
Step 8: Got Feedback?
We'd love to hear from you!